How to Verify Contract Address Ownership?
Table of Contents:
Users can have their ownership of a contract address verified and tied to their Etherscan account. Once this is done, they will have access to submit a token update request for the contract address owned by them. This ensures that only the owner can update the token's information and prevents any other parties from hijacking the token's page, providing a sense of security.
(Please note that all token update requests will be reviewed and subject to approval before being published on our platform.)
Also read: What Is Verify Address Ownership?
Before claiming the ownership of your contract address and updating your token's information, make sure that:
- The source code has already been deployed onto the Ethereum blockchain.
- The source code has already been verified (if you haven't verified it yet, please use this tool to do so).
Steps to verify contract address ownership:
[start]
Step 1: Log into your Etherscan account (if you are not logged in or have signed out previously, kindly sign in here). Alternatively, if you don't have an Etherscan account, you can sign up for one here.
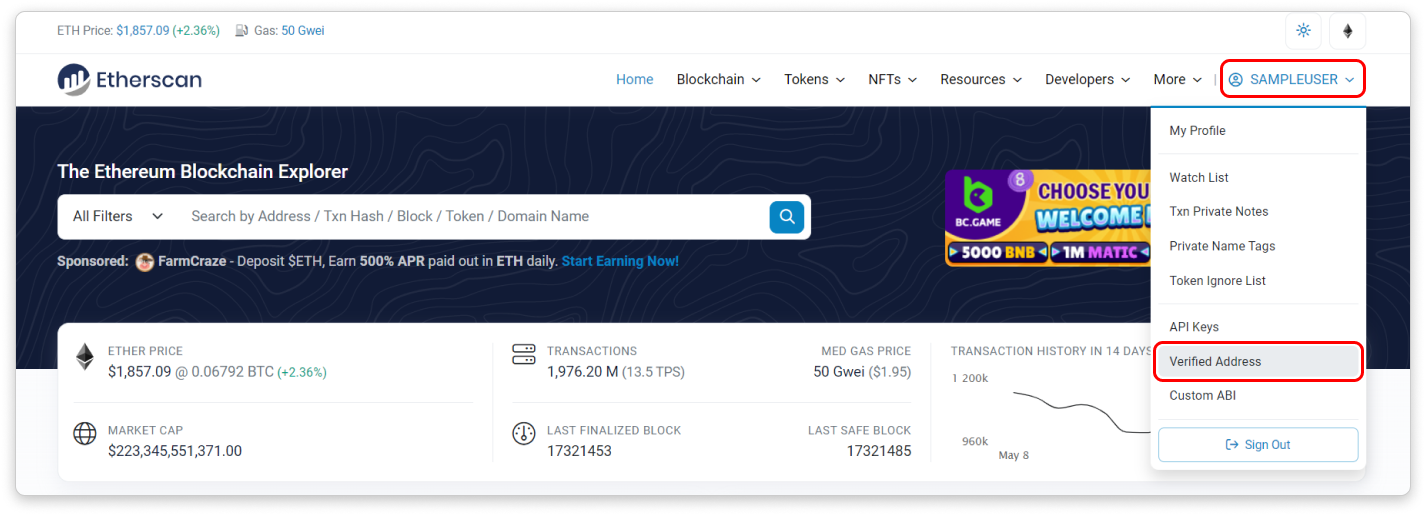
Step 2: Once you are logged in, hover over your username on the top-right section of the website until a dropdown menu appears. Click on Verified Address
[--------]
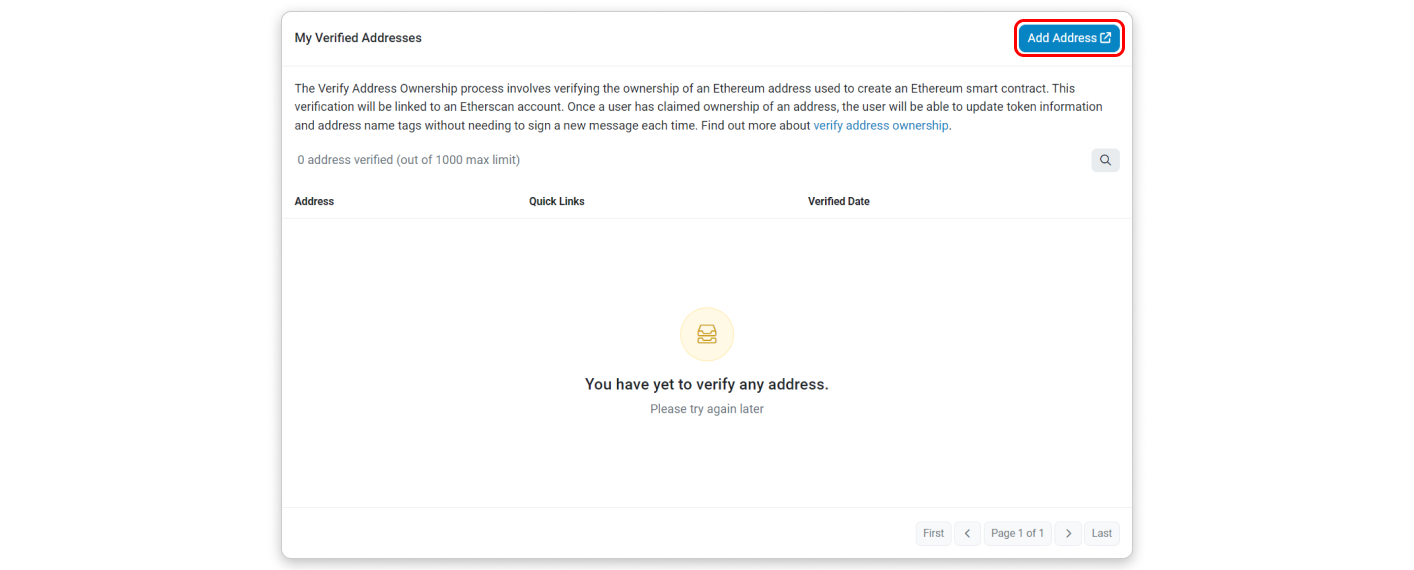
Step 3: The following page will show you how many contract addresses you have verified as yours and what actions you can perform with them. To claim ownership of a new contract address, click the Add Address button on the upper-right area of the page.
[--------]
Step 4: Paste your contract address into the input box and click Continue

[--------]
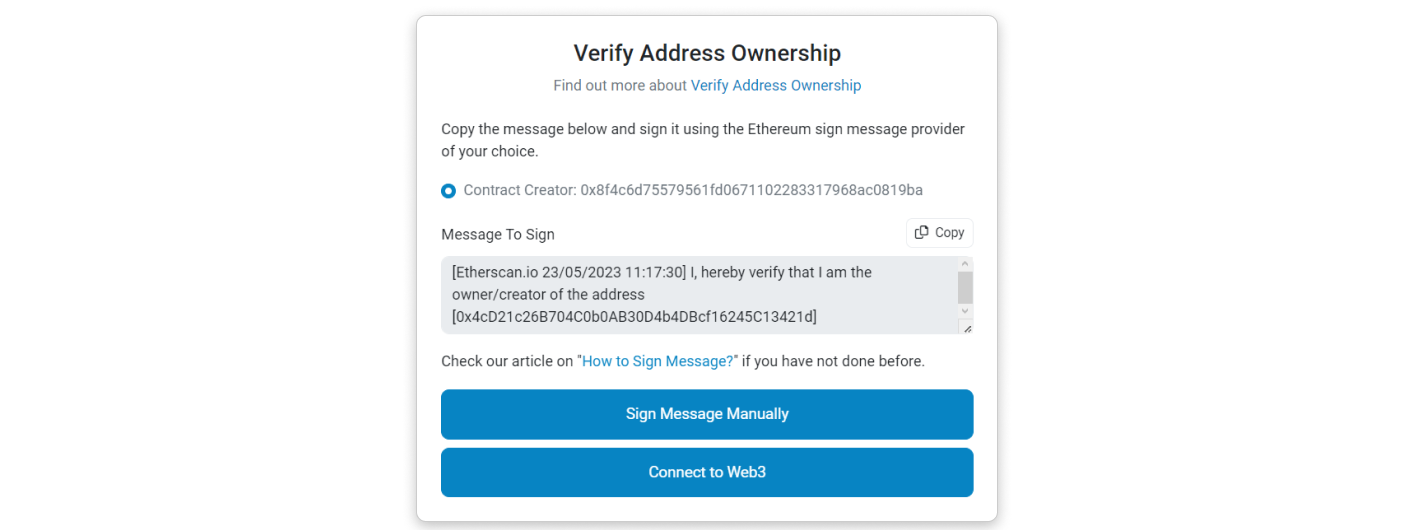
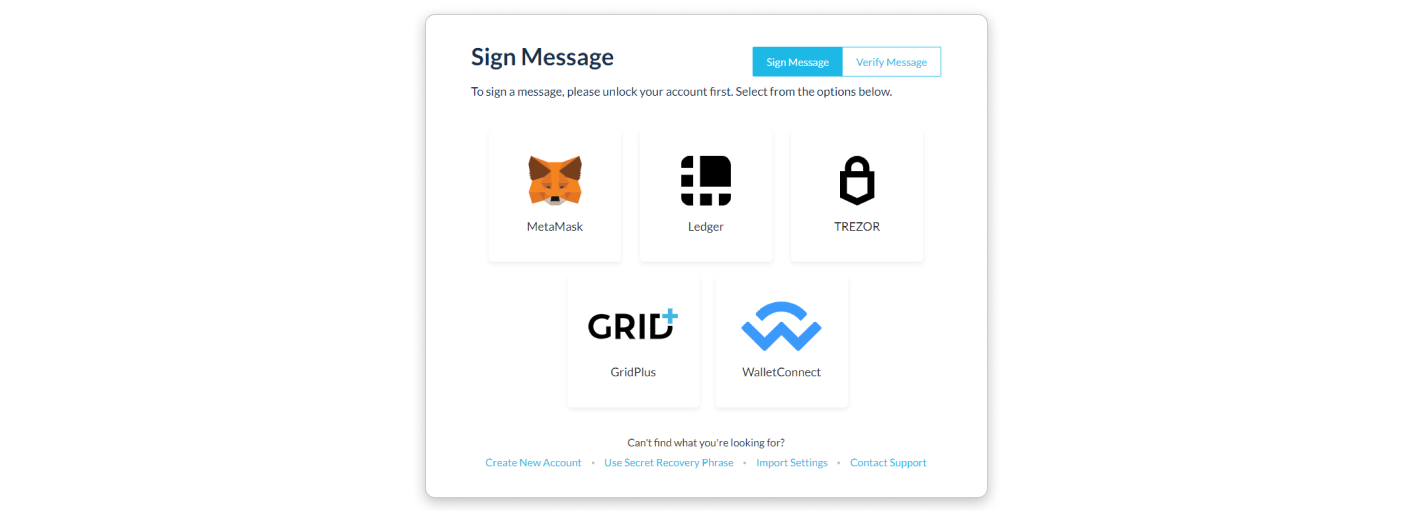
Step 5: You will be provided with options to sign the message with your wallet interface. You can either click on the "Sign Message Manually" button or sign with Web3 (Metamask).
[end]
-
Signing with Web3 (Metamask):
[start]
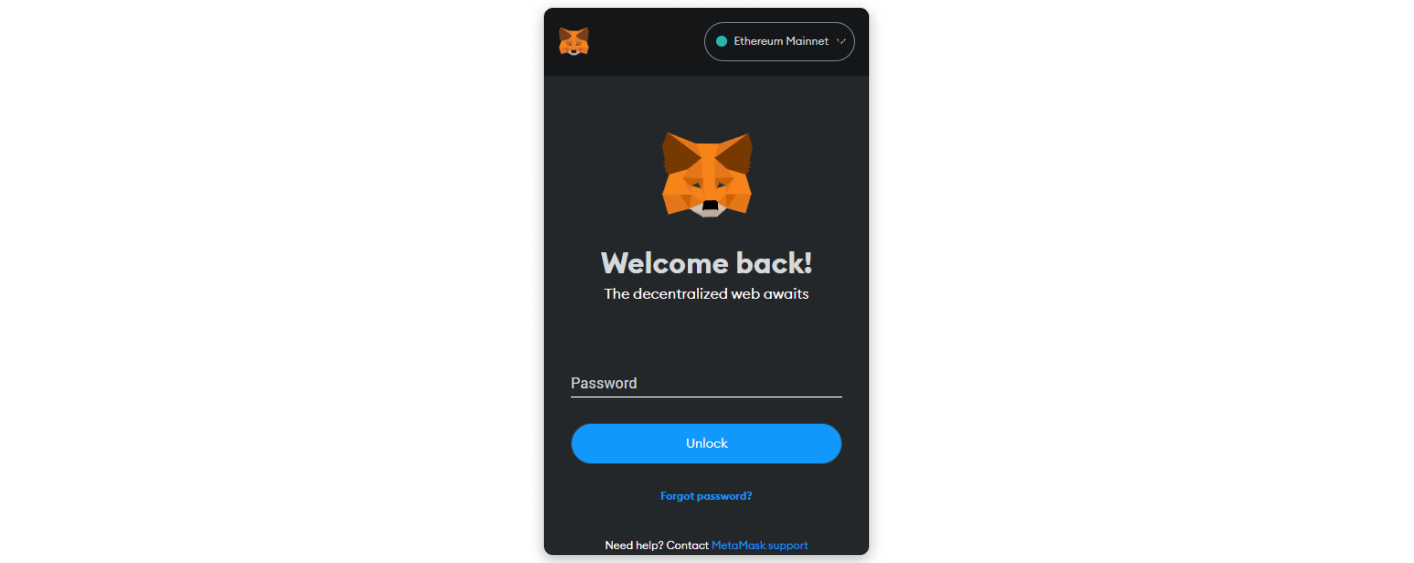
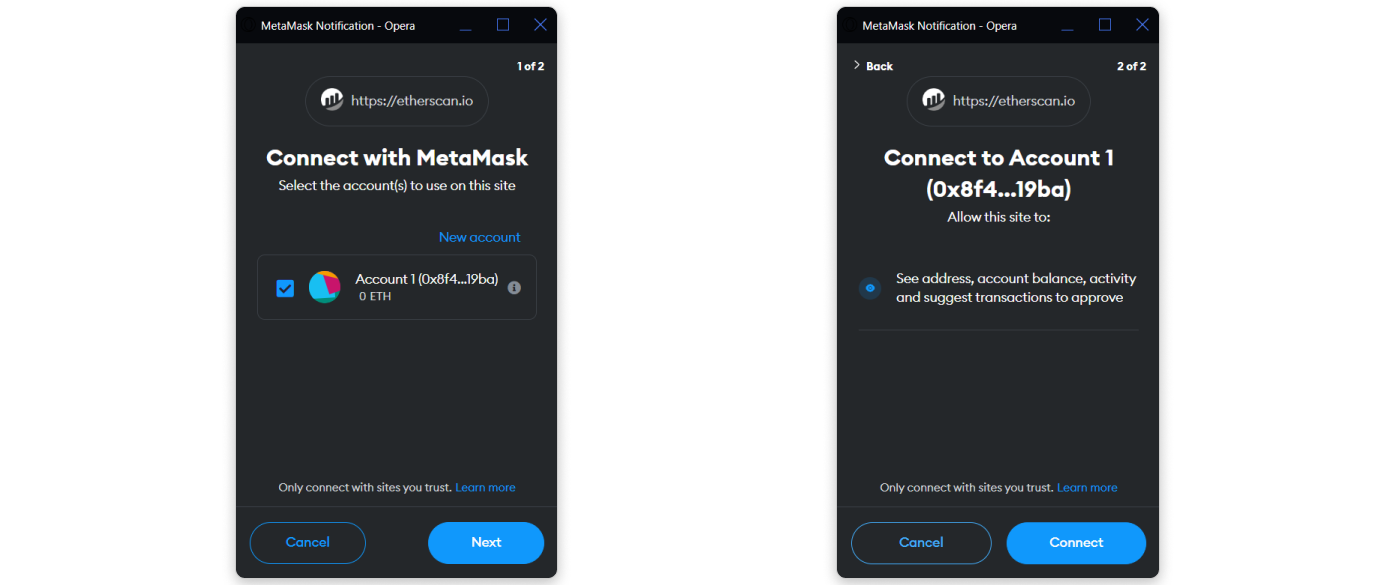
Step 1: Upon clicking "Connect to Web3," you will be presented with the interface to log into your Metamask account.
[--------]
Step 2: Once logged in, choose the account you want to connect to Etherscan.io and click Connect to proceed with signing the message.
[--------]
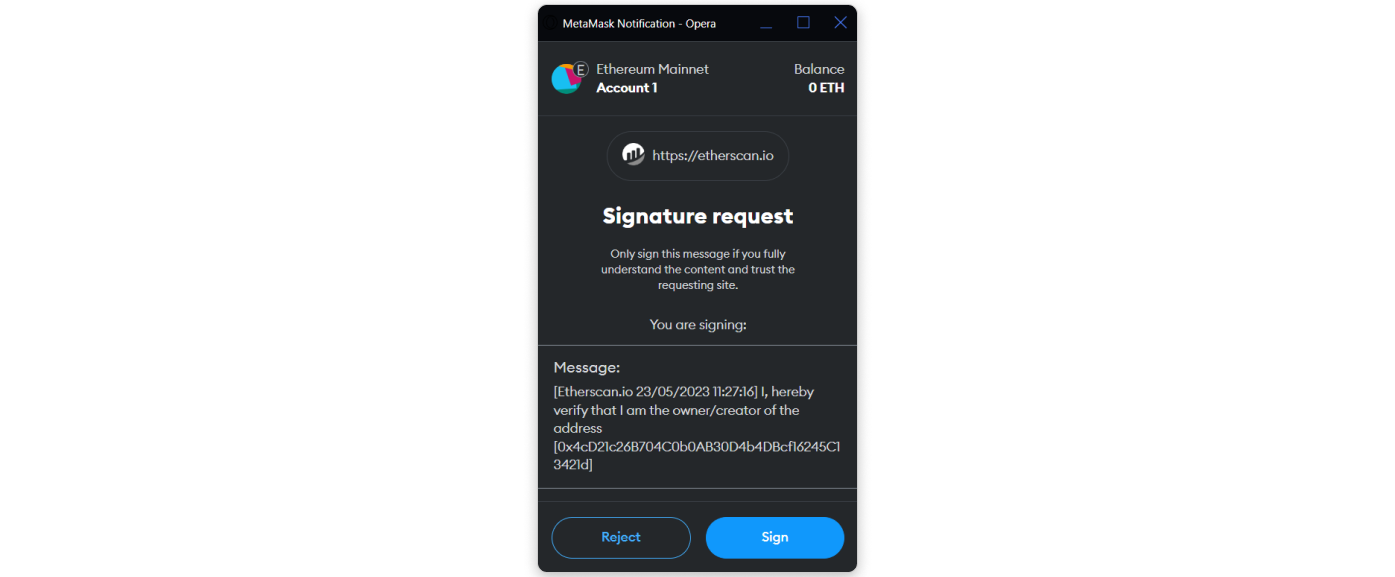
Step 3: Kindly verify the details in the message and if everything is correct, sign the message by clicking on the Sign button.
[--------]
Step 4: After signing the message, click the Click to Proceed button on Etherscan.

[--------]
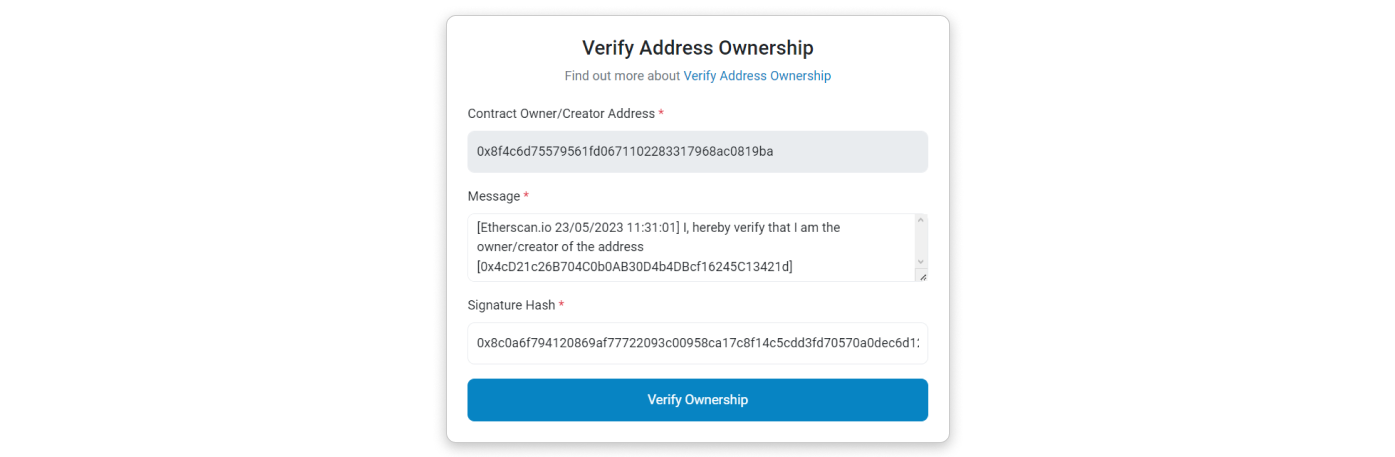
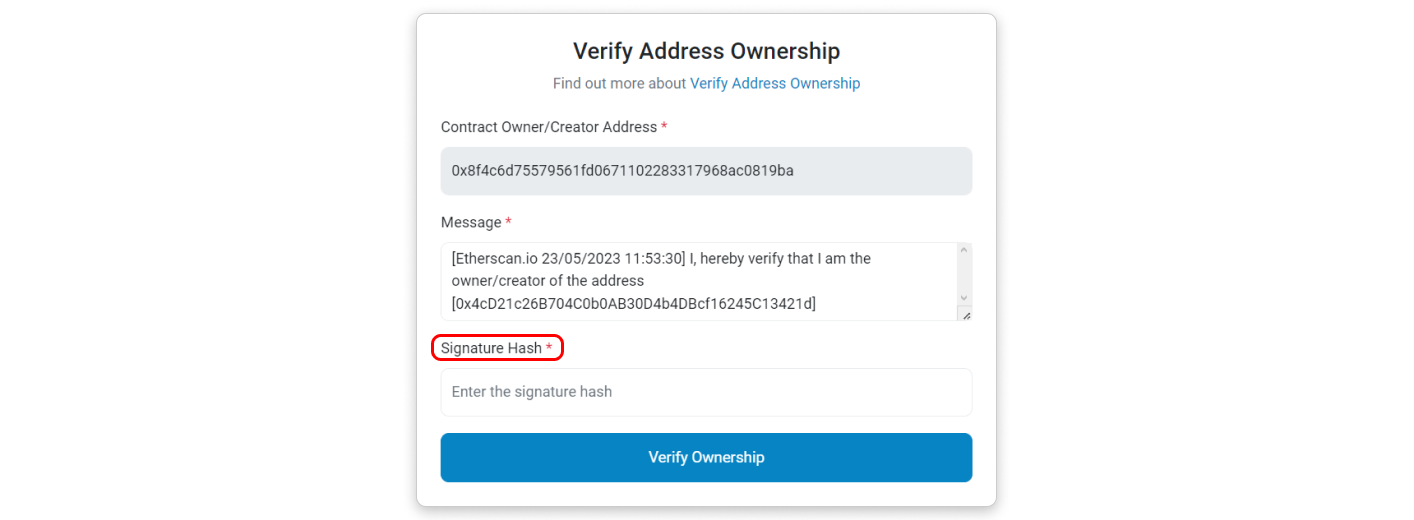
Step 5: You will be directed to a page where the address, message, and signature hash are prefilled. Click on Verify Ownership to proceed.
[--------]
Step 6: You should see a page confirming that you have claimed the ownership of your contract address. On the same page, you will find a list of actions you can now perform with your verified contract address. If you want to update your token's information, click Update Token Information

[end]
-
Signing Message Manually (Using MyCrypto as example):
[start]
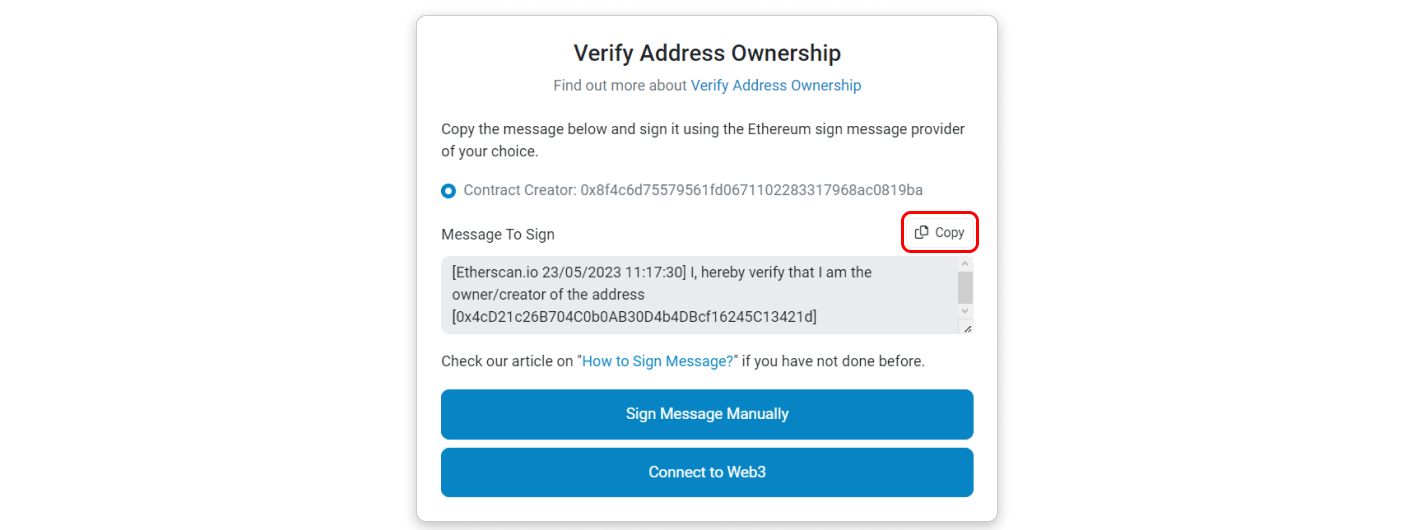
Step 1: Copy the message template provided inside the box by clicking the highlighted button in the screenshot below. Then, click Sign Message Manually
[--------]
Step 2: For this step, open a new tab and go to mycrypto.com and choose any of your preferred wallet service providers that offer a message signing feature.
[--------]
Step 3: After choosing the above options, you will be presented with the steps to connect your wallet. A small popup from MyCrypto will appear at the top-right corner of the browser, asking for permission to connect to your account. Click Connect and paste the message you copied in Step 1 into the input field and click Sign Message

[--------]
Step 4: After signing the message, another box will appear below the Sign Message button. This box contains the details of your signed message and the resulting signature hash. Inside the box, copy the value next to “sig”: and make sure to copy the entire string starting from right after the first “ and ending just before the last “ (or simply double-click on the string of characters to select and copy it)

[--------]
Step 5: Once you have copied the signature hash, return to the Etherscan tab and paste the copied hash into the Signature Hash field and click on the Verify Ownership button.
[--------]
Step 6: If you have followed all the steps correctly, you should see a page confirming that you have claimed the ownership of your contract address. On the same page, you will find a list of actions you can now perform with your verified contract address. If you want to update your token's information, click on Update Token Information.

[end]
Verify Ownership for Bridged Token Contract
Typically, ownership verification requires the token deployer address to sign a message. However, bridged tokens are usually deployed by the bridging service provider’s address, which the token deployer from the origin chain have no access to.
Instead, verify ownership of the bridged token contract by signing a message with the origin chain's deployer address using this template:
[Etherscan.io dd/mm/yyyy hh:mm:ss] I, [Etherscan.io username], hereby verify that I am the owner/creator of the token contract address [bridged token's contract address].
Please make sure the bridged token contract is verified first!
You don't need to publish the signed message, as doing so will reveal your username to the public. After this, follow the steps below to claim ownership of the bridged token.
Steps to verify ownership for bridged token contract:
[start]
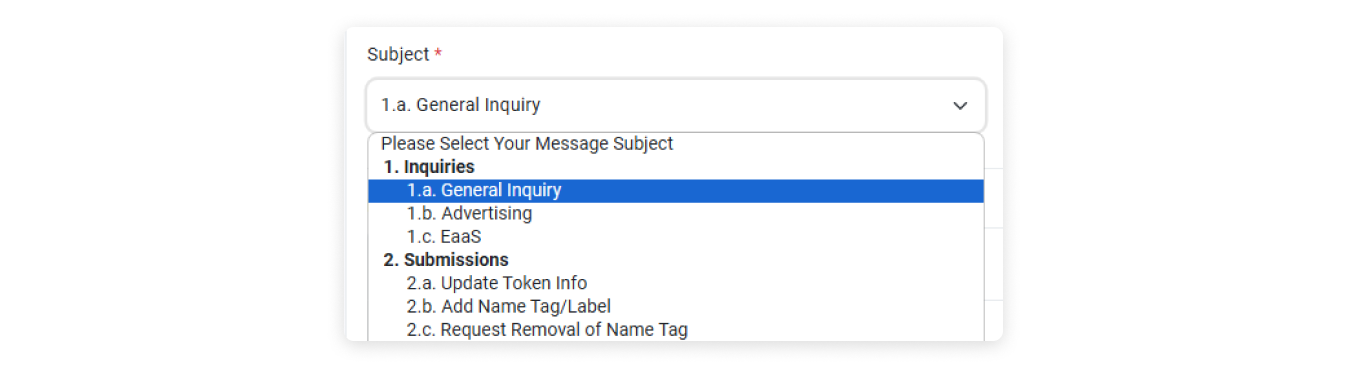
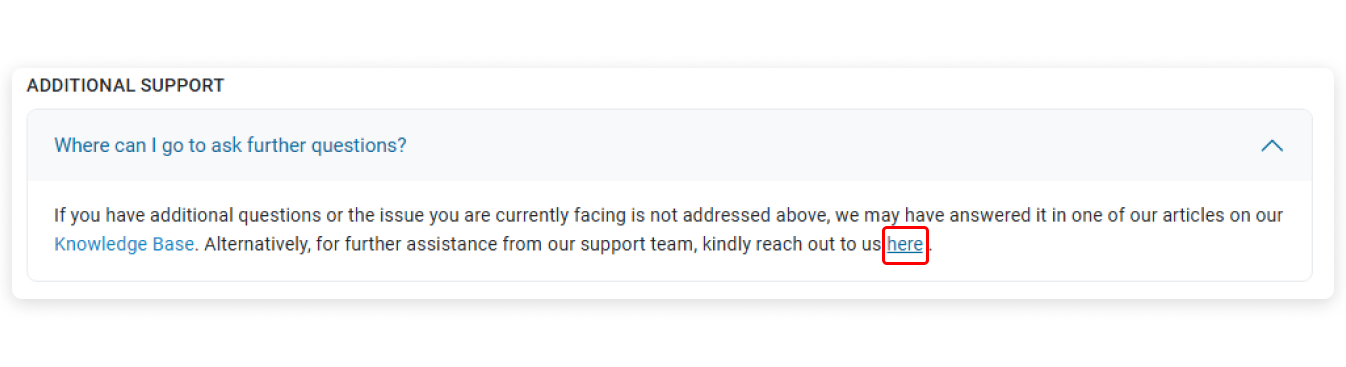
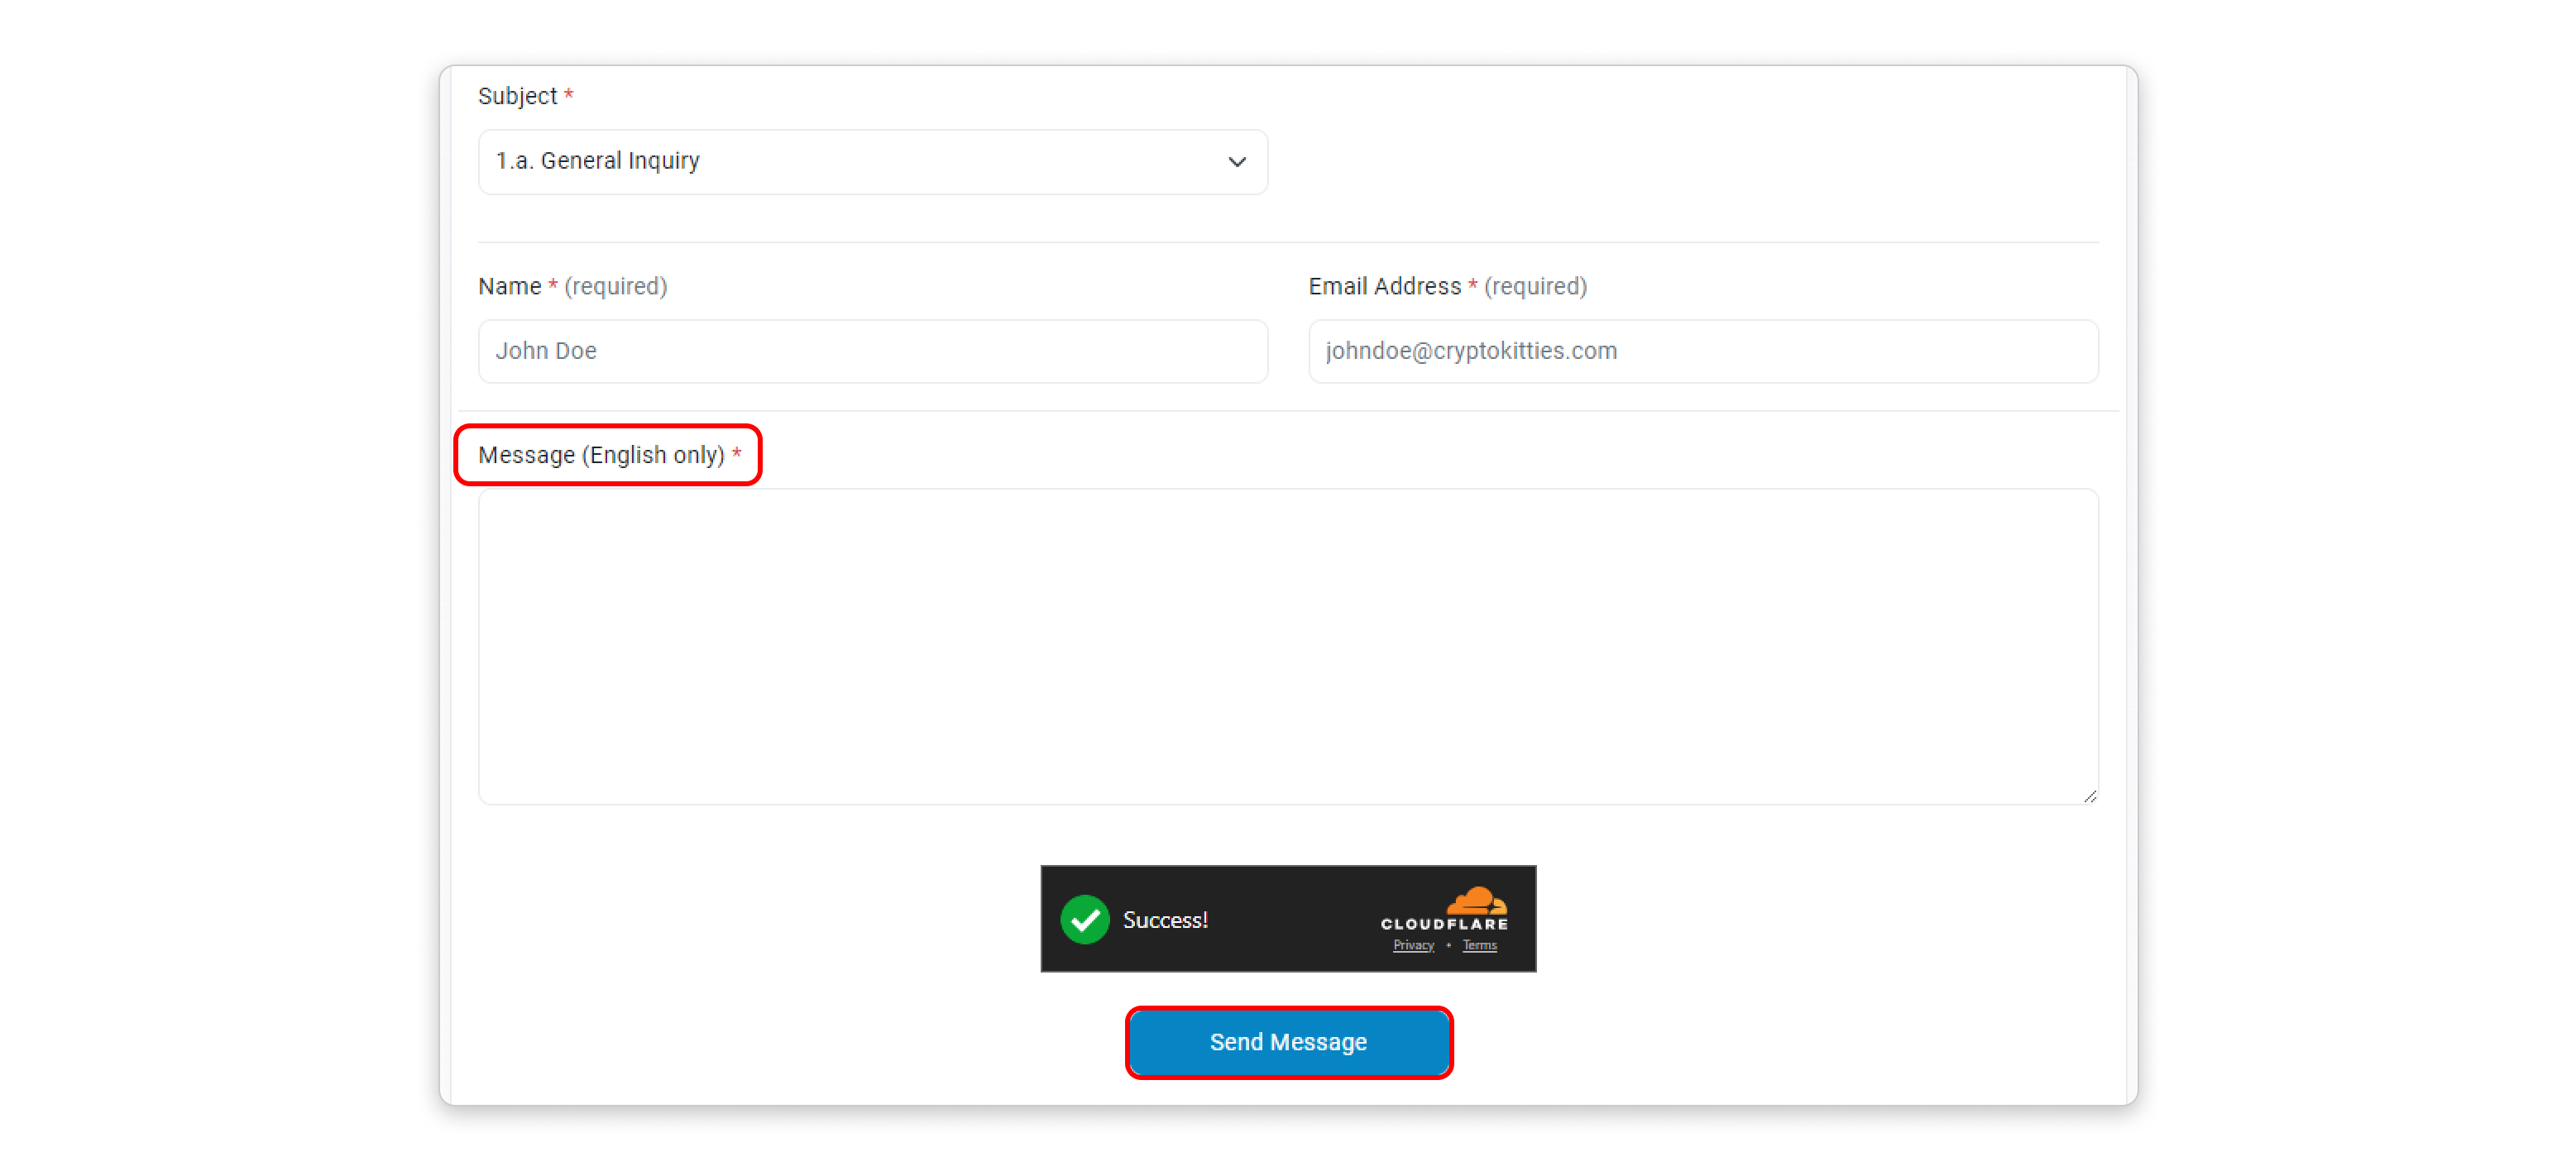
Step 1: Go to our Contact Us page and select "General Inquiry" as your message subject. Then, scroll to the bottom of the page and open the "Additional Support" snippet to view the second screenshot shown below. Finally, click on the link labeled "Here."
[--------]
Step 2: Kindly fill in the information in the box provided below. In the message section, please include the following:
- The bridged token contract address.
- The token contract address from the original chain.
- The full details of the signed message (address, original message, message signature hash, version).
Once completed, click the 'Send Message' button.
[end]
We will proceed with the verification process once we have confirmed that all the information provided is correct.
Now that you have claimed the ownership of your contract address, go back to Etherscan’s homepage and try clicking on Verified Address in the dropdown menu under your username. You will see that your contract address is now listed there and you can proceed to update the information of your token directly from that page without needing to sign another message.
Also see:
How to update Token Information?
Frequently Asked Questions:
1. How to verify ownership of a contract deployed by a multisig?
Any signer of the multisig address can verify contract ownership on behalf of the multisig. One of the signers have to sign a message using the template:
[Etherscan.io dd/mm/yyyy hh:mm:ss] I, [Etherscan.io username], hereby verify that I am one of the signer of the multisig contract address [multisig contract address].
Then proceed to raise a ticket under "General Inquiry" with the signed message, and we will guide you through the rest of the process.
2. How to verify ownership of a contract taken over by the community?
If the community can reach the initial contract deployer, kindly have the deployer sign a message stating the transfer of ownership to a community address. Then raise a ticket under "General Inquiry" with the signed message, and we will guide you through the rest of the process.
If you cannot reach the initial contract deployer, submit a ticket under "General Inquiry" and attach the community takeover announcement from official channels like X (formerly Twitter), Discord, or the Website. Our team will guide you through the rest of the process.